
How to Insulate Your Own Loft
 Fitting loft insulation is not technically difficult, but the working conditions often make the job challenging to say the least. Although unpleasant, fitting correctly laid loft insulation can provide cost savings by saving on your energy bills. Figures from the Energy Savings Trust suggest that by adding 250 mm loft insulation where none was present, at a DIY cost starting at approximately £170, could save £80-£100 annually on your energy bills. This means that you can recover the cost of the work in only 2 years.
If you would like to undertake this work yourself and you are looking for suitable materials, you will find these at Wickes – Loft insulation is bulky and can be tricky to transport – fortunately Wickes offer FREE DELIVERY on many orders! Click here to browse or buy loft insulation materials from Wickes.
Similarly you could pay a professional fitter to fit your loft insulation, which would cost approximately £250 if you were less sure of your DIY skills. Again, if 250 mm of loft insulation were fitted where none was present beforehand, the cost of the work, in terms of energy bill savings would be repaid in 2-3 years.
Loft Insulation Basics
Should you decide to install loft insulation using your own DIY skills, you should conduct some preparatory work before you being the job.
Ask yourself the following questions:
- Do I have easy access to the loft space? Do I have the tools necessary to do the job?
- Is the roof itself in need of repair?
- Is there any chance of insect infestation?
- Is the electric wiring/cabling in good condition?
- Do I have adequate light to lay the insulation in the loft space?
- Are there are holes or cracks to the ceiling?
If the answers to these questions present problems, you would need to address these problems prior to insulating the loft.
Additional considerations prior to starting work
If you do not have easy access to the loft, it would be prudent to create a permanent entrance of a suitable size, which would allow easy access into the loft space for insulation purposes, and also this could be potentially used for storage purposes at a later date if necessary.
Pre-fabricated hatches are available from DIY shops in either timber or tough plastic. Timber hatches can be painted or stained to match existing woodwork in the surrounding environment whereas plastic hatches are normally finished in white (dyed during manufacture) and cannot be refinished satisfactorily. The addition of a fixed retractable (folding or telescopic) loft ladder will be worthwhile if the loft space will be accessed regularly – these retract into the loft space and are hidden behind the hatch when not in use.
Extreme caution should be used when installing a new loft hatch as cutting through ceiling joists without taking certain factors into account could weaken your roof structure – always consult a qualified professional prior to undertaking any work of this nature.
A workman is only as good as his tools, so ensure that you have the correct equipment and materials to begin the job. Do not forget that if a ladder is being used you should ensure that the ladder is fixed securely or being held by a helper.
It would be pointless to start a lost insulation job if the roof was in a state of disrepair. The reasons being, you would lose a substantial amount of heat via the roof itself and undo your excellent loft insulation job and also if the roof needed repairing at a later date it would likely damage the insulation.
Similarly if there was a chance of insect infestation, or if the wiring, cabling or pipework in the loft would need to be updated or repaired, it would be wisest to see to these problems before laying the insulation because it would be more difficult to rectify these problems once the loft insulation had been installed.
If you do not have a good light source in the loft space, you should arrange for a lighting solution to be introduced. This could be either a temporary solution in the form of using an extension lead to run a cable through the loft to hang a light from one of the beams or you could even choose to fix a light permanently. Do not rely solely on using torchlight – use a torch in conjunction with another fixed light source.
You should always ensure that there are no holes or cracks in the ceiling below the loft area that you plan to insulate because these holes or cracks can cause condensation problems by allowing heated air from the room below into the loft space you are insulating. If there are cracks or holes in the ceiling you should fill them before you undertake the work.
The tips so far are fairly general common sense, however, there are a few considerations that are more technically orientated to loft insulation per se. They follow as such:
Do not attempt to work on the joists themselves, this can be dangerous and you could cause substantial damage to the ceiling of the room below should your footing slip. You should use a plank of wood to slide over the joists that you can lean/stand on to support your weight.
Ensure that you insulate the water tank and any other pipe work. Do not insulate directly below the water tankl as a small amount of heat loss through the ceiling directly below it is desirable and can prevent water tanks from freezing in cold weather.
The roof void needs to be adequately ventilated to avoid the possibility of condensation. If you can see the tiles of the roof from the loft space or daylight at the eaves, then the ventilation would be adequate. However, if the roof is felted and you cannot see the roof tiles, or you cannot see any daylight at the eaves, it is likely that you will need to add additional ventilation. A roof void will need ventilation that is equivalent to an area of a continuous 10mm slot at the eaves level.
If you intend to use loose fill insulation material you would need to ensure that the joists have the adequate depth and also that joist end boards are fitted so that the insulation will be kept in the loft as opposed to slipping down between the eaves. If the joists do not have the required depth, you could increase the height of the joists by nailing suitable timber strips to them or alternatively you could simply use insulating material that was thinner to achieve the required insulation level.
How much loft insulation material will I need?
There are two main types of insulating material that you would wish to use to insulate your loft space. These being roll material and loose fill material. If you are planning to use roll insulation material you will very often find that the distance between the joists will be the same width or up to 50mm under the width of the roll. This being the case it simply leaves you to count the number joist spaces across the loft and work out how many rolls are required to fill the spaces. If you intend to use loose fill material, a simple rule of thumb is that 200 litres of loose fill insulation material will be typically required to achieve 200mm coverage per square metre.
Safety aspects of fitting loft insulation
Mineral wool insulation can be hazardous and as such it is extremely important to handle with care as it can irritate the throat and skin. You should consider the following non-exhaustive list of precautions when considering laying this type of insulation:
- Do not open the insulation packaging in living areas. Only open the packaging once you are in the loft space itself and open it very slowly so that loose mineral wool fibres do not become airborne and present a breathing hazard.
- When using mineral wool insulation make sure that you wear a snug fitting facemask to prevent nose and throat irritation and also wear protective gloves to prevent the hands from making contact with mineral wool as this can cause severe irritation. Suitable safety goggles should be worn to ensure that loft insulation does not come into contact with the eyes as it will cause extreme discomfort and possibly damage the eyes due to it’s abrasive nature.
- Similarly, try to cover your body with as much protective clothing as possible, this includes wearing long sleeved tops, tucking shirts/t-shirts and socks into trousers, tuck gloves into your top, etc. There will be a temptation to wear clothes to keep you cool because the temperature can soar whilst in the loft space, but you should ensure at all times that your clothing covers you sufficiently to protect you from the harmful mineral wool insulation material. Disposable overalls can be obtained from DIY stores and these often have hoods – they are ideal for protecting you from the insulating materials and can be discarded after use – the only downside of these is that they can be torn relatively easily and so care must be taken not to snag them on any stray nails or rough timber.
- Ensure that all waste insulation material is placed into airtight bags in the loft space before potentially taking it through the house for disposal.
- Ensure that whilst you are working, the door/hatch separating the loft from the house is kept closed.
- Once the work has been completed, you should dispose of the mask and any other clothing as you see fit. If you choose to keep the clothing, make sure it is washed thoroughly and separately from your normal clothes washing.
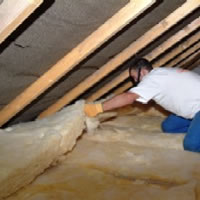
How to fit mineral wool roll loft insulation
We have provided you with a simple step-by-step guide towards fitting mineral wool loft insulation. To fit the insulation material, you should follow these steps
- Remove any debris between the joists and ensure that the area is relatively clean.
- You should attempt to seal any large gaps where pipes or cabling run through the ceiling into the loft. You can use standard interior decorator filler for this task.
- Fit any ventilation panels if they are required.
- You can now start to unroll the insulation material. Start at the eaves and unroll the mineral wool between the joists to the centre of the loft very slowly and continue to the wall plate, whilst ensuring that the mineral wool is not stretched and that you leave enough of a gap at the eaves to allow for sufficient ventilation.
- The insulation should be fed under any cabling and roof members that go across the joists.
- As noted previously, you should not insulate under the cold water tank as this should be insulated entirely separately.
- If pipes or cables run down the eaves, simply push the insulation around them. If the pipes or cables run away from the eaves, you can cut the insulation to fit around them. If the pipes have been laid in such a way as that it is impractical to cut the insulation to fit around them, it may be necessary to use loose fill insulation in those affected areas.
- After you have laid your first piece of insulation, start with another piece at the other end of the loft and roll it towards your previous piece. When they meet, you should neatly cut and butt the pieces together in the middle. This process should be repeated until the whole area has been insulated.
Finally, do not forget to insulate the hatch/door that leads into the loft space. Cut an appropriately sized piece of insulation that fits properly and make sure that the edges are sufficiently draught proofed. Some prefabricated hatches have integrated draught-proofing and a polystyrene slab affixed to the loft-side of the hatch – these do not require additional insulation.
How to install loose fill loft insulation
- Remove any debris between the joists and ensure that the area is relatively clean.
- You should attempt to seal any large gaps where pipes or cabling run through the ceiling into the loft. You can use standard interior decorator filler for this task.
- Make sure that the gaps between the joists are sealed underneath the eaves to ensure that the insulation is kept in the loft. Products for retaining the insulation at the eaves can be purchased from DIY shops or you can simply screw a board at the end of each pair of joists. Whatever you choose, there should be sufficient ventilation.
- Pour the loose fill insulation between the joists to the required depth. Most joists are on average only 125mm deep, so you will likely need to raise the level of the joists in order to provide yourself with sufficient insulation. Do not simply pour over the joists – you should raise them instead.
- Electric cables should be kept above the insulation and for any pipes that run alongside the joist space, the insulation should be eased between or over as required.
- Block the joist space around any water tanks so that the loose fill insulation does not reach, as they will need to be insulated separately.
- Finally, ensure that the hatch/door that leads into the loft space is insulated. Loose fill insulation does not produce the best results for this, so it would be preferable to use mineral wool roll for this task and once fitted, ensure that there is sufficient draught proofing.
If you would like to undertake this work yourself and you are looking for suitable materials, you will find these at Wickes – Loft insulation is bulky and can be tricky to transport – fortunately Wickes offer FREE DELIVERY on many orders! Click here to browse or buy loft insulation materials from Wickes.
Professional loft insulation installed
If after reading our loft insulation diy guide you have decided that you are not confident enough to complete the insulation work yourself and would instead prefer a professional to complete the job for you, B&Q also offer a professional delivery and installation service in conjunction with British Gas. This can be ordered online very easily, and more information on their loft insulation delivery and installation service can be found online.