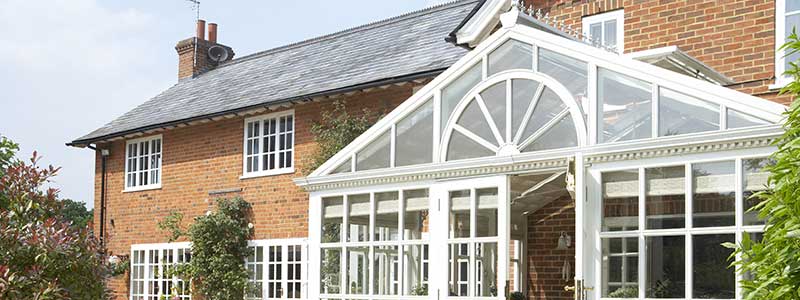
A Guide to DIY and Self-Build Conservatory Projects
 If you are a competent DIY enthusiast and possess the range of skills necessary to undertake a self-build conservatory project then you may be able to save a considerable amount of money in the process.
It is essential to plan your project carefully and to obtain building regulations approval and planning permission where necessary before undertaking any work as failure to do this can result in expensive remedial work or even having to take down your conservatory!
There are a variety of DIY conservatory kits available now from established retailers such as B&Q, Wickes and Focus as well as a number of online retailers. Many of the self-build conservatories available are designed to accommodate bespoke accessories such as purpose-designed roof blind and side-blind kits – and this further aids cost-reduction since these can be an expensive purchase if made to measure by a blind specialist. The B&Q conservatories currently available appear to be particularly modular in this regard. Some manufacturers systems can accommodate hidden extras such as audio speakers.
It is important to check exactly what is included with your DIY conservatory – items such as fixing bolts, sealant, screws, frame packers may seem like a small outlay but they can soon mount up and add significant costs to your project.
You will need to decide on the size and shape of your new conservatory and prepare your base accordingly – in most cases this will require the preparation of a concrete base and a dwarf-wall on which the conservatory frame will rest. The exact dimensions of both the base and particularly the dwarf wall will depend on the chosen conservatory frame dimensions and shape. Both the base and the dwarf wall will need to be constructed well in advance of the actual DIY conservatory construction. The concrete conservatory base will need time to fully cure before the dwarf wall can be laid and then further time will be required for the mortar to set on any brickwork before you can begin the erection of your conservatory frame. It is absolutely essential that a DPC (damp-proof course) forms part of your base and dwarf-wall construction. If you are opting for a ‘full height conservatory’ then a dwarf wall will not be required as the frame extends from the conservatory base upwards.
Other important considerations forming part of the planning stage of your self-build conservatory project are electrics and plumbing – you will need to plan your conservatory wiring and check capacity on the distribution board in your home as you may need to upgrade your existing consumer unit (fusebox) before you can extend your wiring. It may be possible to incorporate your conservatory mains wiring into your existing ring main but ideally it should be on its own separate circuit.
As well as the mains socket locations, light-switches and the position of any wall or ceiling lighting that you plan to use inside your conservatory, you will also need to make provision for any electric underfloor heating or air-conditioning units that you may wish to incorporate, initially or at a later date.
Unless you are replacing an existing conservatory with your self-build conservatory, you are likely to fall foul of new electrical regulations governing new domestic mains wiring installations and as a result your wiring will most likely need to be checked by a suitably authorised contractor or inspector.
If you are opting for under-floor heating that is driven by your central heating then you will also need to check capacity of your boiler and the versatility of your controller. More information is available in our under-floor heating section.
Assembling the main body of your self-build conservatory will require the help of a couple of assistants since the various sections of the conservatory frame and roof will need to be lifted into place and held there while the various fixings are secured. The side sections of the conservatory and the door frame will need to be assembled and secured prior to the roof sections and glazing bars being lifted into place and assembled. Once the entire frame has been assembled and secured the conservatory glazing can be put in place and any sealing work undertaken – you should now have a weather-tight structure and can begin working on guttering and completing any additional external work.
Once the building work has been completed and any internal modifications made in terms of access to the conservatory space, the internal work can commence. If your conservatory uses a dwarf wall as part of its construction then this is likely to require the fitting of window sills and also plastering unless you have chosen to finish it in another manner, such as with timber panelling. The same applies to the external wall of your property that now forms an internal wall of your conservatory. Any wiring or pipework that will be hidden behind plaster or panelling will need to be addressed at this stage.
You will need to allow time for any plasterwork to go off and dry out before it can be decorated, though in practice this will not prove too much of an issue as once the dirtier aspects of the build have been finalised work can be undertaken on other areas in the meantime. Now is probably the best time to begin work on your flooring if you are using an under-floor heating system. Once your system is connected and tested you can then lay whichever material is going to provide the sub-floor for your chosen flooring.
Once your under-floor heating and sub-floor are in place, you can lay your flooring and fit any skirting boards as required – if you are laying a timber or tiled / stone floor these will give a neat edge and hide the edges of the flooring. You can also fit any lighting, fans, mains sockets etc and undertake any additional decorating and the fitting of blinds and any additional soft furnishings.
If laying a floorcovering such as cushioned vinyl you should note that ladders can permanently damage this type of flooring, particularly if the protective end-caps are damaged – ideally you should put a thick timber sheet such as plywood down under the feet of the ladder before climbing it. This may also be advisable with certain stone products such as slate as not only can they be marked or scraped but their riven texture may in some cases result in the ladder rocking slightly and being unstable in use.
Now you’re done and you can move your furniture into place, relax and enjoy the view from your DIY conservatory project with the extra satisfaction that not only did you build it yourself, but that you probably saved a good deal of money in the process!
DIY not for you? Leave it to the professionals!
One of the more established names, Anglian, have been making and installing high-quality products since 1966 and offer a 10 year warranty on all uPVC products and a 15 year warranty on gas-filled sealed glazing units for peace of mind with your new conservatory. You can request a free Anglian quote by clicking here.
If building your own conservatory sounds too much like hard work then the best way to get started is to select around 3 different FENSA registered specialists and arrange for them to come to your home and show you the range available, and advise you on how best to make use of the space in which you are planning to erect your conservatory – they may be able to offer size or layout options that you hadn’t even considered as well as specific conservatory planning permission or building regs information relevant to your particular project.